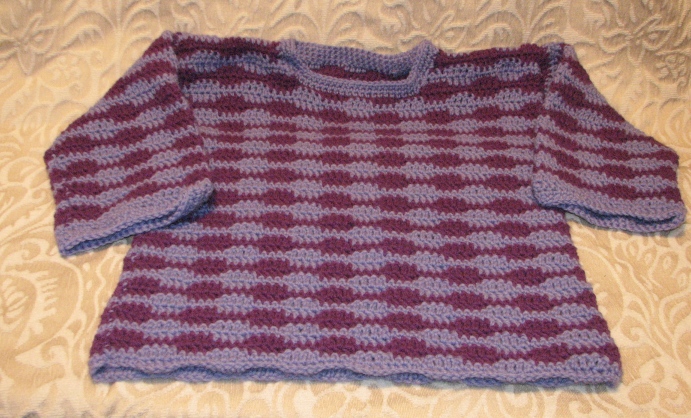
Saturday, December 26, 2009

Christmas present


This jacket is the "Mandarin Jacket" from Crochet! magazine November 2007. The yarn is Lion Brand Kool Wool (50% merino, 50% acrylic) in "Navy" and "Denim." This yarn is discontinued, which is a shame. It has great stitch definition, is easy to work with, nice twist, very warm (in spite of being "kool"), soft and non-itchy to people who are sensitive to that. I needed a few more skeins of Navy to finish and was lucky to find it on Ebay!

The frogs are one of the things that make the jacket interesting. These were from Windsor Button Shop.


And here is the recipient in the jacket....

Monday, November 23, 2009

WIP

Prototype #1

This was my first attempt at making a top-down raglan sweater pattern. These are my notes -- although it looks nice and is wearable, there were some issues with it as a pattern so I don't recommend that anybody follow these instructions until I have cleaned them up and validated a good, reproducible pattern with another prototype.

update: working on prototype #2, the simplest fix for the issues mentioned above seems to be to use an H hook for the BLO yoke part, G for the body, and F for the ribbing at the ends of sleeves & body. The changed instructions are highlighted in red. Still needs more testing.

update 2: more modifications made to the pattern to allow for more room over the shoulder.

goals:
  • top-down, one-piece raglan sweater with no seam sewing.
  • good coverage for cold weather, a placket and collar like a polo shirt rather than a v-neck or crew neck.
  • dense fabric for warmth -- no holes or lacy stitches
  • ribbing to keep in warmth
  • easy stitches, but possible to embellish with decorative stitches if so desired
  • lends itself to using multiple colors, partial skeins, etc., but can also be made in one color
  • knitting worsted weight

materials: I started with leftover Caron Simply Soft Brites yarn from the previous baby shower blanket. Each skein was 6 oz. originally, mostly intact (perhaps 5 oz left). The Blue Mint and Iris were larger, complete skeins. There was some Blue Mint leftover, but not enough to matter. Everything else was used up completely.

Caron Simply Soft "Brites", Grape - 6 oz. (color A)
Caron Simply Soft "Brites", Watermelon - 6 oz. (color B)
Caron Simply Soft "Brites", Lemondate - 6 oz. (color C)
Caron Simply Soft, Blue Mint - 7 oz. (color D)
Caron Simply Soft, Iris - 7 oz. (color E)

crochet hook size H, G and F.
4 buttons.

size: this makes a sweater suitable for a size 8-10 child. One of the issues with the pattern that needs to be fixed for a "production version" is that the yoke, made in back-loop-only single crochet (BLO sc), works up to a narrower gauge than ordinary single crochet. For me, that was about 9 st to 2" for the BLO sc, and 8 st to 2" with ordinary sc. With a top-down raglan, the proportions of the yoke dictate the shape and size of the whole sweater. I worked to CYCA measurements based on the yoke. When I switched to sc for the decorative stitches, the body became wider than the yoke. When put on a size 8 child (which I did not get to do until it was almost completely done), the yoke part fit nicely, but the body was overly loose. When put on a size 12 child, the body was fine, but the fit over the shoulders was snug.

update: this gauge situation may be fixed by using an H hook for the BLO yoke, a G hook for the body, and F hook for the sleeve & bottom ribbing. But is is important to check one's gauge for each section and adjust appropriately.

gauge: 8 BLO sc = 2" with H hook, with G hook 8 sc = 2", 9 rows of sc = 2"

Notes:

The key to a top-down raglan is that it is worked in one piece, with 4 "corners" where all the increases are made. The corners give the effect of a 45 degree angle "seam." When the yoke has reached the point where it is large enough that the corners can meet under the arm, the corners are joined and the body and sleeves are then worked in the round.

This sweater is worked starting at the center front neck opening. In order to make a nice rounded neck opening, this part of the sweater will be shaped over the succeeding rounds with increases at the front until the front opening is the proper size. Once the yoke has reached the size needed to fit under the arm and be joined, a collar and placket will be added. The plackets will be overlapped and crocheted together when the first body round begins.

work over all ends as you go.

stitches:
BLO sc -- work single crochet in back loop only of stitch below
raglan inc -- 3 BLO sc in center of group of 3 st in row below
front neck inc -- 2 BLO sc in first and last st of row
fpdc -- front post double crochet.
bpdc -- back post double crochet.
long sc -- insert hook in sc 2 rows below, draw up loop to level of current row, YO and draw through both loops on hook
sc dec -- single crochet decrease. insert hook in next st and draw up loop, insert hook in st after that and draw up loop, YO and through all loops on hook

make yoke:
with color A and hook H, ch 43
row 1: 3sc in second ch from hook, sc in next 10ch, 3 sc in next ch, sc in next 18 ch, 3 sc in next ch, sc in next 10 ch, 3 sc in last ch, ch 1 turn [50 st in row]
row 2: 2 BLO sc in first st (front neck inc made), 3 BLO sc (raglan inc made) in next st, BLO sc in next 12 st, raglan inc, BLO sc in next 20 st, raglan inc, BLO sc in next 12 st, raglan inc, front neck inc, ch1 turn [60 st in row]
row 3: front neck inc, BLO sc to center of previous raglan inc, raglan inc in center st, BLO sc to center of previous raglan inc, raglan inc, BLO sc to center of previous raglan inc, raglan inc, BLO sc to center of previous raglan inc, raglan inc, BLO sc to last st, front neck inc, ch1 turn.
row 4-8: continue working as for previous row, making front neck inc at beginning and end of each row and raglan inc in center of raglan inc of previous row until end of row 8.
row 9: front opening will be worked even from now on, no more front neck inc at beginning and end of rows. BLO sc in next st, continue in established pattern to end of row, ch 1 turn.
row 10-26: work as for row 8. At end of row 26 there should be a total of 32 st across each front piece (excluding corner), 70 st across the back (excluding corner), and 62 st across each shoulder (excluding corner). At the end of row 26, fasten off.

collar:
with color B and hook H:
collar row 1: attach yarn to wrong side of front neck opening, ch 3 (counts as first dc), dc in side of next 7 rows, dc in back of starting chain all around side and back of neck, dc in side of next 8 rows, ch 3, turn. Ch 3 counts as first dc of next row.
row 2: work *fpdc in next st, bpdc in next st, repeat from * to end, ch 3, turn.
row 3-4: work fpdc around each bpdc st in previous row and bpdc around each fpdc st in previous row. ch3, turn at end of row, ch3 counts as first dc of next row.
fasten off.

right placket:
with color B and hook H:
right placket row 1: attach yarn to bottom of right-hand front opening on front side, sc in side of each yoke row up to collar, make 2 sc in side of each row of collar, ch 1 turn.
row 2: sc in each sc to end, ch 1, turn
row 3: if sweater is for a girl, work buttonholes in this row as follows: *sc in next 3 st, ch 3, skip 3 st, repeat from * 4 times, sc in each st to end, ch 1, turn.
row 4-5: repeat row 2, fasten off

left placket:
left placket row 1: attach yarn to top of left-hand collar edge on front side, 2 sc in side of each collar row, sc in side of each yoke row to end, ch 1, turn
row 2: sc in each sc to end, ch 1, turn
row 3: if sweater is for a boy, work buttonholes in this row as follows: *sc in next 3 st, ch 3, skip 3 st, repeat from * 4 times, sc in each st to end, ch 1, turn.
row 4-5: repeat row 2, fasten off

join yoke and begin body:
overlap plackets with buttonholes on top, pin in place. Plackets should overlap so that the placket adds 4 stitches to the total size of the front section. (note that plackets are 5 rows wide).

Change to size G Hook, attach color C to back underarm corner on the right side.

body row 1: sc in corner and each st across back to next corner (72 st). skip shoulder stitches (58 st), sc in next corner st, sc in each st across front to placket (106 st), work 4 sc in end of rows of placket, working through both layers of overlapped placket to next corner st (144 st), sl st to starting st, ch 1, turn.
row 2-3: sc in each st across. Join all rows with sl st, ch1, turn.
row 4: sc in next 2 st,*ch 1, skip st, sc in next 3 st, repeat from * to end, sc in last st. sl st to join, fasten off.
row 5: attach color B. sc in next st, *long sc over ch into sc 2 rows below, sc in next 3 st, repeat from * around, sc in last 2 st, sl st to join, ch 1, turn.
row 6: *ch 1, skip st, sc in next 3 st, repeat around to end, sl st to join, fasten off.
row 7: attach color D. *long sc over ch to sc 2 rows below, sc in next 3 st, repeat from * around, sl st to join, ch 1, turn.
row 8: repeat row 4.
row 9-10: attach color C. repeat row 5-6, do not fasten off.
row 11-12: repeat row 2-3, fasten off.
row 13-16: attach color D. repeat row 2 for 4 rows, fasten off.
row 17-28: repeat color sequence from rows 1-12, reversing color B and color C.
row 29-74: attach color E. repeat row 2 until length from underarm is 14 1/2".

bottom ribbing:
using F hook, attach color D to right side of work.
row 1: dc in each st around, sl st to join, ch 3, turn (ch3 counts as first dc of next row)
row 2: *fpdc in next dc, bpdc in next st, repeat from * around, sl st to join, ch 3, turn.
row 3-5: bpdc in each fpdc in row below, fpdc in each bpdc in row below, sl st to join, ch3, turn.
fasten off at end of last row.

sleeves:
Use size G hook
row1: attach color C to underarm corner, sc in each st around shoulder side of yoke to form sleeve, sl st to join, ch 1, turn. (64 st)

Decrease as you go: Work as for body, but taper sleeve by making sc dec at beginning and end of rows every 4th row until 36 st remain in sleeve, then work even with 36 st around.

row 2-28: repeat body pattern rows 2-28.
row 29-32: repeat rows 13-16.
row 33:-64: repeat patterns rows 1-36, until length from top of yoke to end of sleeve is 14 1/2".

sleeve ribbing:
use F hook
row 1: with last color used, work row of sc around bottom of sleeve, making 8 sc decreases evenly spaced.
row 2-7: attach color C, work as for bottom ribbing.

Make another sleeve for the other side.

finishing:
weave in any remaining ends.
sew buttons to placket to match buttonholes.
block.

Sunday, November 15, 2009

baby shower blanket


Now that my Afghan projects are done for a bit, I have made this blanket for an upcoming baby shower for a local friend. The pattern is from Woman's Day Granny Squares, No. 1, published in 1973. I am very fond of old vintage crochet magazine.

The yarn is Caron "Simply Soft" in Lemonade, Watermelon, and Grape. The photo looks a bit more blue than it is in reality -- that is a purple color. It is not yet blocked, but I wanted to talk the picture while I had some natural light.

Thursday, November 12, 2009

baby blanket of leftovers...


For completeness, this is the baby blanket I was able to make from the leftover squares of the Youth blanket posted earlier. The same squares, but with 3 extra rows of dc around each square to make them 12", then sewn together 3x3 and a border of 6 dc rows added around to get it comfortably over the 40" minimum. Off to Afghanistan!

Tuesday, November 10, 2009

pattern creation

I am thinking of working up some patterns that would be handy for the Afghans For Afghans program. Right now I am thinking about sweaters for youth. Here are a few areas where I would love feedback from other crocheters:

Fabric: for the sake of warmth, the fabric wants to be fairly dense. Single crochet will make the densest fabric (even more so with variations like long sc). Double crochet will make a looser fabric, but goes faster. Half double crochet is a possible compromise -- makes an interesting texture, goes a little more quickly than sc but is more dense than dc. There are various stitch combinations, often some various of a short stitch (like sc or sl st) with a taller stitch (dc orh dc), where one alternates on each row putting the "tall" stitch into the shorter stitch in the row below and vice versa. It can make an interesting texture and can be a little more fun to make. Post crochets can be used to make cable-like or basketweave textures and add to the density, but they use up a lot of yarn. Shells are pretty, but generally are less dense.

Style: pullover or cardigan? Pullovers feel quicker and easier, but cardigans may be more flexible. One idea is to make a pullover with a something like a henley or polo shirt type collar (a slit with a few buttons and various collar styles). This lets the pullover be snug against the neck if the wearer chooses and gives plenty of room to pull it on.

Edges: ribbing or not? Ribbing at the waist and sleeve cuff makes the sweater fit more snugly and keepts out drafts. It is also more work than just making a straight body/sleeve and takes longer. Ribbing in crochet can be done with post stitches worked vertically across rows, or worked side to side with with rows of sc worked in the back loop, the width of the rows being equal to the height of the ribbing (usually with a smaller hook than the body). The ribbing band then gets turned on its side. There are 3 ways to deal with the second kind of ribbing: 1.) make the ribbing first and then work a base row of sc along one long side of the ribbing band as the foundation for the body, 2.) make the ribbing last (sl st into the body and ch a base for the ribbing, turn and sc in back loop only, sl st into the body to end a row and sl st again to begin the next row), 3.) make the ribbing separately (crochet a separate band) and sew it on.

Sleeves: many modern patterns have no sleeve cap or armhole shaping. This makes it very easy to do, but the shoulder seam is well below the actual shoulder/arm joint. This can make it a bit bulky, or if the sleeve isn't wide enough at the top there can be a problem with not enough ease. Does the convenience of working straight blocks of fabric override the shaping? There are some compromises here -- the sleeve doesn't have to be as formed as a suit jacket, but can be more trapezoidal in shape and set into a relative square armhole indented in the body.

Color: I like putting decorative color patterns on things. I also think it is good if a design encourages the use of small leftovers of yarn, like the Invest for Peace vest does. An easy way to use multiple colors is with stripes, of course. The ribbing and such can be a different color from the body. And one can use tapestry crochet methods to work colored patterns across the work.

Your thoughts and preferences on all these aspects of a pattern are much appreciated, whatever your experience level!

Monday, October 26, 2009

Blanket

This blanket for the Afghans For Afghans Youth Campaign was made using a square inspired by this Leisure Arts booklet. For my own records, 30 squares took:

9 sk (50 gr ea) "Wool of the Andes" variegated worsted (from ebay, could probably never find this color again)
2 sk (100 gr ea) Moda Dea Washable Wool, "Raspberry" (more like 1 1/4 sk)
3 sk (100 gr ea) Patons Classic Wool, "That's Purple" (more like 2 1/2 sk)
3 sk Patons Classic Wool, "That's Blue"

Only 20 squares ended up being used, 4x5 squares with a wide border to make a blanket 42"x52". The 10 leftover squares are being enlarged and will make a baby blanket, for the CURE Children's Hospital Campaign.

more chunky mittens

These mittens are similar to the previous pair, but used less chunky yarn, Araucania Nature Wool Chunky. This allowed for a smaller hook and tighter gauge. They fit a teenager or medium sized adult

to help me remember this basic pattern:

materials: chunky wool (weight "5"), approx 150 gr, size "H" hook

dec = YO, insert hook and draw up loop in st, insert hook in next st and draw up loop, YO and draw through all loops

popcorn = YO, repeat (insert hook into st, YO and draw up loop, draw through 2 loops on hook) 4 times, YO and draw through all loops on hook, ch 1

gauge: 30 hdc = 8"

ch 30, sl st to join, ch 2 (join all rounds this way)
row 1-13: hdc in each st around, 30 st each row not counting turning chain
row 14: hdc in next 9 st, ch 6, skip next 6 st, hdc in next 15 st
row 15: hdc in next 9 st, 6 hdc in chains, hdc in next 15 st
row 16-26: hdc in each st around
row 27: dec in next 2 st all around (15 st total)
row 28: hdc in each st around
row 29: repeat dec in next 2 st until last st, hdc in last st (8 st total)
row 30: dec in next 2 st all around (4 st)
row 31: dec, dec, fasten off and sew top together

thumb:
join yarn to beginning of thumb opening, ch 2
row 1: working around thumb opening, hdc in each st across bottom (6 st), work dec through side of hdc, work 6 hdc into base of row at the top of thumb opening, work dec in side of turning ch, join with sl st, ch 2 (14 st total)
row 2-6: hdc in ea st around
row 7: dec in each 2 st around (7 st total)
row 8: dec in each 2 st around, hdc in last st (4 st total)
fasten off and sew top together

cuff: various treatments are possible here. This one uses little popcorns:
row 1: attach contrasting color to beginning of foundation chain, repeat( sc, ch1, sk next st, make popcorn, ch 1, sk next st) all around, join to starting st and fasten off
row 2: attach main color to beginning st, repeat (sc in sc below , make long sc over ch into foundation chain below, sc in top of popcorn, long sc) all around, fasten off

work 2nd mitten, making thumb opening after 15 hdc, instead of 9 hdc

chullo hat

I made this hat from leftovers of the blanket project (all destined for Afghanistan). I thought I'd write down the pattern so I don't forget it this time, as I tend to make it up as I go along. (For the life of me I cannot figure out why blogger wants to put this picture in sideways).

Correction posted 11/15/09

materials: Knitting worsted yarn, approx. 50 gr variegated Main Color, (MC), small amounts of red (A) and purple (B). Size "G" hook.

Gauge: 4 sc = 1"

notes: join all rows with (sl, ch 1)
inc = 2 sc in same stitch
dec = insert hook in st and pull up loop, insert hook in next st and pull up loop, yarn over and pull through both loops

to change colors: on stitch before new color change, insert hook in st, YO and pull up loop with existing color, then YO new color and draw through all loops on hook. Begin next st with new color and work until next color change. Work over strands of yarn not in use

finished size: fits 20" head, suitable for teenager or small adult.
can be adapted for other sizes -- 96 st will fit larger adult, 80 st will fit child, 72 st will fit infant
[TBD, adjust directions for different sizes)

with MC ch 4, sl st to form ring, ch 1
row 1: 8 sc in ring
row 2: inc in each stitch around -- 16 st total
row 3: *inc, sc, repeat from * 8 times -- 24 st total
row 4: *inc, sc in next 2 st, repeat from * 8 times - 32 st total
row 5: work even, sc in each st
row 6: work 8 increases evenly spaced -- 40 st total
row 7: work even, sc in each st

repeat row 6 & 7 until 88 stitches total; 19 rows
finish off MC

first color band:
row 1: attach color A, sc in each st around
row 2: *sc with color A in next 3 st, change to B and sc in next st, repeat from * all around
row 3: *sc with color A in next 2 st, change to B and sc in next 2 st, repeat from * all around
row 4: *sc with color A in next st, sc with color B in next st, repeat from * all around. Drop color B
row 5: change to color A, sc in each st around. Fasten off A

row 6-10: change to MC, work even

second color band:
row 11-15: work same as for first color band, reversing color A and B

row 16-17: change to MC, work even, finish off after joining for last row

earflap 1:
row 19: skip 12 st, attach MC, 20 sc across, ch 1, turn
row 20: sc in each st, ch 1, turn
row 21: dec, sc across to last 2 st, dec, ch 1, turn
repeat row 20 & 21 until row has 6 st (33 rows)
repeat row 21 until row has 1 st, fasten off (36 rows)

earflap 2:
row 19: skip 24 st from first earflap, attach MC and work as for earflap 1

edging: attach B to center back, work sc in each sc, and sc in side of each row of earflap, sl in first sc and fasten off

make ties:
cut 10 ft piece of color B, fold in half and in half again
tie slipknot in cut end, slip knot over a doorknob or similar protrusion and pull snug
put a pencil or hook through folded end and twist until yarn becomes very, very taut
tightly grab yarn in the middle and carefully fold the end with pencil to meet end on doorknob -- yarn will twist around itself very suddenly, so watch out!
tie a knot in yarn near the doorknob end and remove from doorknob
trim ends evenly

attach ties to earflap

Tuesday, October 20, 2009

Mittens

I wanted a break from the blanket I am making (almost done, should be ready to ship by the weekend) and thought of whapping out some mittens. I don't normally work with bulky yarn or big hooks, but I had some hanging around from a previous felting project and I was attracted to this pattern. Seemed like a good match and I was able to finish in an evening. I didn't have the fluffy furry yarn to edge the cuffs with, so I did a couple rows of loop-stitch for fun. They should fit a teenager in Afghanistan.

Sunday, October 18, 2009

Snowy Sunday in October...

I've been working on squares for a blanket while it snows here today. The squares run about 9". The colors are richer than the lame cell phone picture would show. Right now have enough squares to make a 45" square blanket, trying to go for 45"x54" for the Afghans For Afghans Youth Campaign.

Thursday, October 15, 2009

Time passes...

and various Xmas/birthday/baby/charity projects happen for a couple years without much documentary evidence. If I find any, I'll post about them.

Right now I just completed a pullover for the current Afghans For Afghans youth campaign. The pattern is Coats & Clark's "Wiggles Sweater", made with Paton's Classic (purple) and Jojoland (sky blue) wool that I had around. I made it a bit longer and added more to the neckline and cuff to give better coverage. I wasn't able to tackle one of my friend's five children who are a great resource to help me size things, but that seemed right. It worked up quickly, which is good when in a rush like this, but next time I will probably do something more interesting. It will go in the mail to SFO tomorrow.

The wedding outfit

The young friend who modelled the hats got married around Christmas time (2007) and I wanted to make her something special. She has a wonderful "Jackie Kennedy" look and we decided to make a suit with a felted pillbox hat for her "going away" outfit. The pattern is from Lily Chin's "Couture Crochet" book. The suit yarn is Berroco Merino, the hat yarn is Malabrigo.


Baby blanket

Another Afghans For Afghans project from 2007. This baby blanket began as a great buy on some clearance sale yarn. But there wasn't enough, so I had to get more from my LYS that would coordinate with it. The "coordinating" yarn ended up not really going with the original yarn, and I ended up ditching the bargain yarn (used in a later project) and getting more of the "filler" yarn to make this. (The yarn is Cestari heathers.)

I wanted to make something that was inspired by oriental rug designs. I had a much more complex idea in mind at the beginning and then ended up simplifying it hugely to get it done and to work with the yarn quantities that I had. I came out looking pretty well, but already I can't reproduce it. I would probably do some things quite differently if I were making something like it again.

Getting started...

I started crocheting... many years ago. There was a time when I was flat on my back with an injury and to keep from going insane I crocheted everyone in my family an afghan. Since then I have done more or less of it based on what was going on in my life. A few years ago (2006?) I started up again and have been at it since. Most of it gets given away and I have been terrible about taking any photos. I usually think of it just after I've taped up the box and slapped a shipping label on it.

A couple of years ago I started crocheting for Afghans For Afghans . My first contribution was a stack of chullo hats, which of course, did not get photographed. However, a couple stayed here in the US and a friend modelled them: